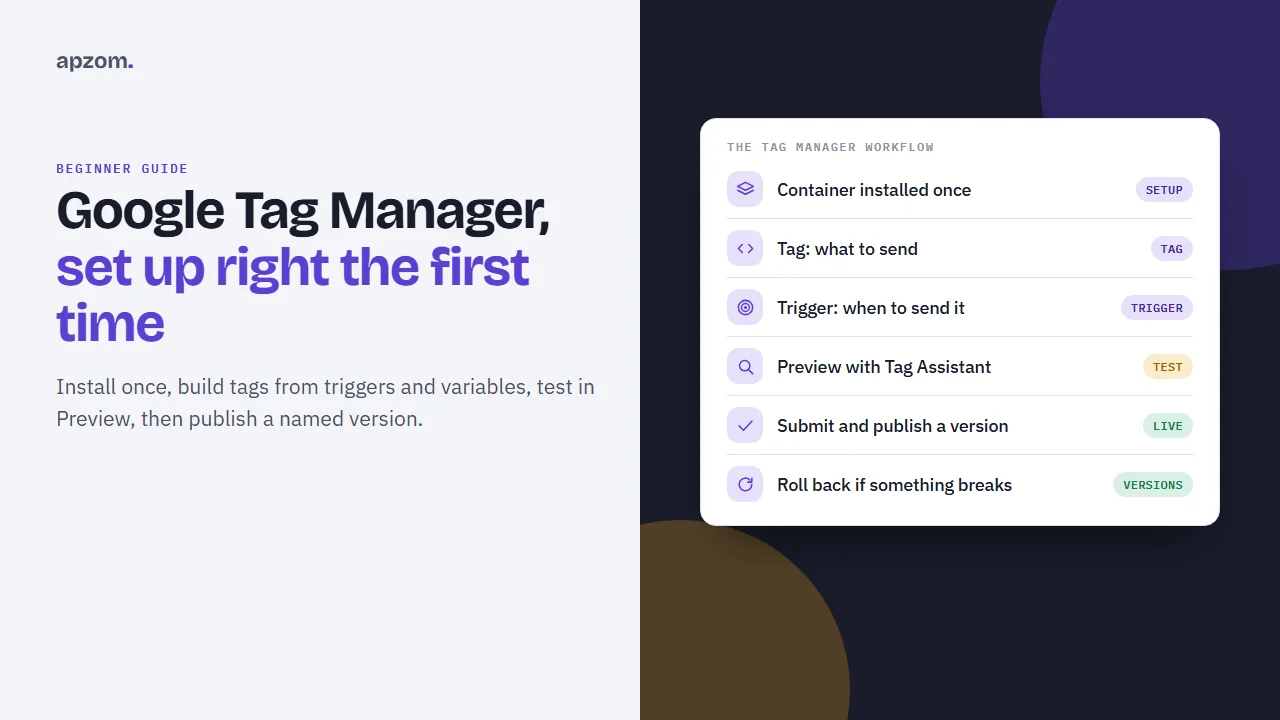
The short answer: Google Tag Manager (GTM) is a free Google tool that lets you add and change tracking code, such as Google Analytics 4, Google Ads conversions and the Meta pixel, from one web interface instead of editing your website’s code each time. To start, create an account and a Web container at tagmanager.google.com, install the container’s two code snippets on every page of your site (once only), then build each tag from three parts: the tag (what to send), the trigger (when to send it) and variables (the details). Test every change in Preview mode with Tag Assistant, and only then click Submit and publish a named version. Nothing you build goes live until you publish, and you can roll back to any earlier version.
This guide is for small business owners, marketers and website managers anywhere in the world who want to set up Tag Manager properly the first time. It covers installation on common platforms, your first two tags (the Google tag for GA4 and a lead event), the test-and-publish workflow, versions and rollback, consent basics, and the mistakes that most often break tracking. It follows Google’s Tag Manager Help at the time of writing; Google changes menu labels from time to time, so if a label differs, look for the nearest match.
Before you start
You need:
- A Google account with access to your website’s analytics. Use a business-owned account, not a freelancer’s or agency’s personal one, and add others as users.
- A way to add code to every page of your website, or a platform integration that does it for you (see the installation section below).
- Your GA4 tag ID (it starts with “G-“), if you want to send data to Google Analytics 4. Our guide to setting up Google Analytics 4 explains where to find it.
- A list of what you want to measure, for example form submissions, calls, WhatsApp clicks or bookings. Tag Manager sends data; it does not decide what is worth measuring.
Do you need Tag Manager at all? Not always. If you only need GA4 on a simple website, the Google tag added by a plugin or your website builder is enough. Tag Manager earns its place when you have several tags (analytics, Google Ads, Meta, LinkedIn), when you want to track clicks and form submissions without a developer each time, or when more than one person manages tracking.
Framework 1: how Tag Manager works
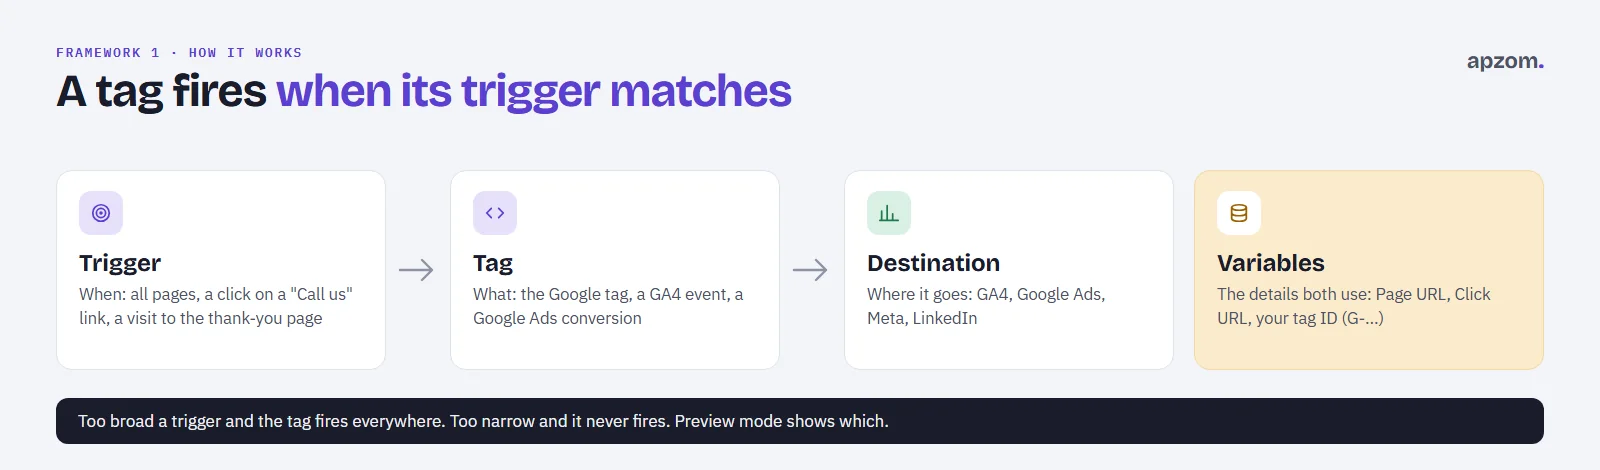
Everything in Tag Manager is built from a few parts:
| Part | What it is | Example |
|---|---|---|
| Account | The top level, usually one per business | “Your Business Ltd” |
| Container | Holds the tags for one website or app; this is the code you install | “yourbusiness.com”, Web |
| Workspace | A draft area where you make changes before publishing | “Default Workspace” |
| Tag | A snippet of code that sends data somewhere | The Google tag for GA4, a GA4 event, a Google Ads conversion |
| Trigger | The rule that decides when a tag fires | All pages; a click on a “Call us” link; a visit to the thank-you page |
| Variable | A value a tag or trigger uses | The page URL, the click URL, your tag ID |
| Version | A saved snapshot of the container that you can publish or roll back to | “v3: added lead event” |
The idea to remember: a tag fires when its trigger’s conditions are met, and it uses variables to fill in the details. Most beginner problems come from a trigger that is too broad (the tag fires everywhere) or too narrow (it never fires).
Step 1: create your account and container
- Go to tagmanager.google.com and sign in with your business Google account.
- Open the Accounts tab and click Create Account.
- Under Account Setup, enter an account name (usually your business name) and your country.
- Under Container Setup, enter a container name (Google suggests your website’s main address, for example yourbusiness.com) and choose Web as the target platform.
- Click Create and accept the Terms of Service.
Create one container per website, not one per page. Google’s guidance is one container for each of your company’s websites and apps. If an agency or freelancer will help you, add them later as users under Admin > User Management rather than letting them create the account; that way the container stays in your business’s account.
Tag Manager is free. Its paid version, Tag Manager 360, is sold through Google’s sales team for large organisations; the main difference a small business will notice is that the free version allows three workspaces at a time (the default plus two), while 360 has no limit and adds features such as approval workflows and Zones.
Step 2: install the container on your website
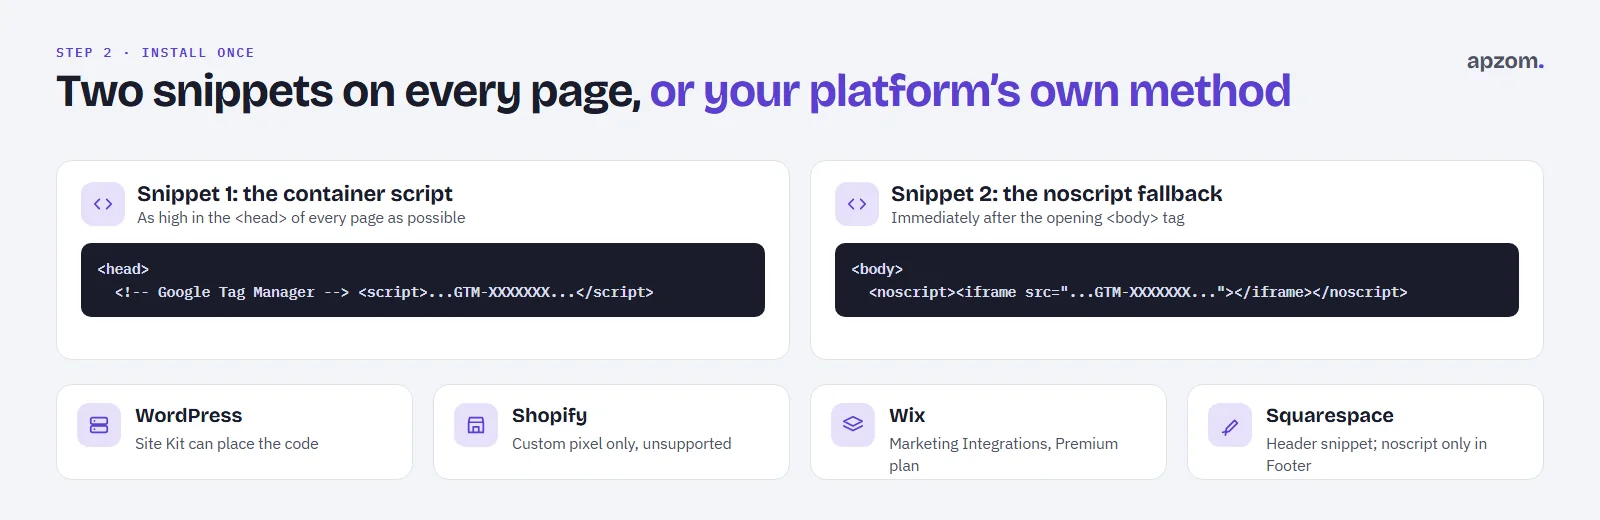
When you create the container, Tag Manager shows an Install Google Tag Manager box with two snippets of code. You can open it again at any time by clicking your container ID (it starts with “GTM-“) in the Workspace tab.
- The first snippet goes as high in the
<head>of every page as possible. - The second snippet (it starts with
<noscript>) goes immediately after the opening<body>tag on every page.
To check the install, use Test in the Install Google Tag Manager box, or open Preview (Step 4): if Tag Assistant connects and shows your container ID, the container is loading.
If your website runs on a common platform, use its own method rather than editing theme files:
| Platform | How to add Tag Manager | What to watch for |
|---|---|---|
| WordPress | Google’s free Site Kit plugin: Settings > Connect More Services > Set up Tag Manager, with “Let Site Kit place code on your site” switched on. Or a theme or plugin field for head and body code | If Site Kit already sends Analytics, do not add a second Analytics tag inside Tag Manager; Site Kit warns this can affect tag or reporting functionality |
| Shopify | Shopify asks you to check apps first (for Google tools, the Google & YouTube app). Otherwise Tag Manager can be added as a custom pixel under Customer events | Shopify says custom pixels are unsupported by Shopify; they run in a sandbox, and Tag Assistant’s troubleshooting does not work with them |
| Wix | Dashboard > Marketing Integrations > Google Tag Manager > Connect > Add Google Tag Manager, enter your container ID, then Save | Needs a Premium plan and a connected domain. Wix says not to use custom code to connect Tag Manager |
| Squarespace | Code Injection: paste the first snippet into Header | Code injection needs a Core, Plus, Advanced or some legacy plans. There is no slot right after <body>, so the noscript snippet can only go in Footer. Squarespace says it can’t help you set up or troubleshoot Tag Manager |
If you use a data layer (some plugins and developers do, to pass values such as form names to Tag Manager), Google’s rule is to declare it above the container snippet with window.dataLayer = window.dataLayer || []; and never overwrite it later in the page.
Install Tag Manager once. If your site already has a hard-coded Google Analytics snippet (gtag.js), a plugin that adds Analytics, or a website builder’s own Analytics field, decide which one sends GA4 data and remove the others. Google warns that if the same Google tag is configured two or more times on a page, it “may cause duplicate data or mixed settings”. A common symptom is inflated page views. Google’s Tag Assistant (tagassistant.google.com) can show you which tags a page loads.
Step 3: add your first tags
Start with two tags: one that sends page data to GA4, and one that records a lead.
Tag 1: send page data to Google Analytics 4. Google’s getting-started guide uses the Google tag:
- In your workspace, go to Tags and click New. Name the tag, for example “Google tag – GA4”.
- Click Tag Configuration and choose Google Tag.
- In Tag ID, enter your GA4 tag ID (it starts with “G-“).
- Click Triggering and choose the built-in Initialization trigger (Google’s pages show it as “Initialization – All Pages” or “Initialization – All Initialization Events”).
- Click Save.
Google’s current GA4 set-up page also offers a route it marks as recommended: a Google Analytics destination tag (Tag Configuration > Google Analytics > Google Analytics), with the same ID and an Initialization trigger. Either works for a beginner; use one, not both. Google’s release notes added destination tags on 12 October 2026, and existing Google tags keep working. If you set up GA4 in Tag Manager before September 2023, your old “GA4 Configuration” tag has already been converted into a Google tag; Google made that change automatically on 5 September 2023.
Tag 2: record a lead. The most reliable beginner method is a thank-you page: if your form sends people to a page such as /thank-you/ after they submit, every visit to that page is a lead.
- Go to Triggers, click New, choose Page View, then Some Page Views, and set the condition Page Path equals /thank-you/ (use your own page address). Save it as “Thank-you page”. Check the exact path in Tag Assistant’s Variables tab (Page Path), because a missing or extra trailing slash stops the trigger firing. Note that a visitor who reloads the thank-you page counts as a second lead.
- Go to Tags, click New, and choose Google Analytics: GA4 Event (Google’s pages also show it as “Google Analytics Event”).
- In Measurement ID, enter your GA4 ID (it starts with “G-“). In Event Name, enter a name; GA4’s recommended event for a lead is
generate_lead. - Choose the “Thank-you page” trigger and save.
- After it is published and data arrives, mark the event as a key event in GA4 (Admin > Data display > Events), as our GA4 set-up guide explains.
If your form does not redirect to a thank-you page, Tag Manager has Form submission and Click triggers, but they behave differently from form to form, so test them carefully in Preview. Clicks on phone numbers and WhatsApp links can be tracked with a Click trigger on links whose Click URL starts with “tel:” or contains “wa.me”. Count these as interest, not as confirmed leads.
Not sure what your current tags are doing? Ask for a Free Growth Audit. We check what your Tag Manager container and website send to GA4, Google Ads and Meta, what fires twice, and what is missing.
Step 4: test in Preview mode
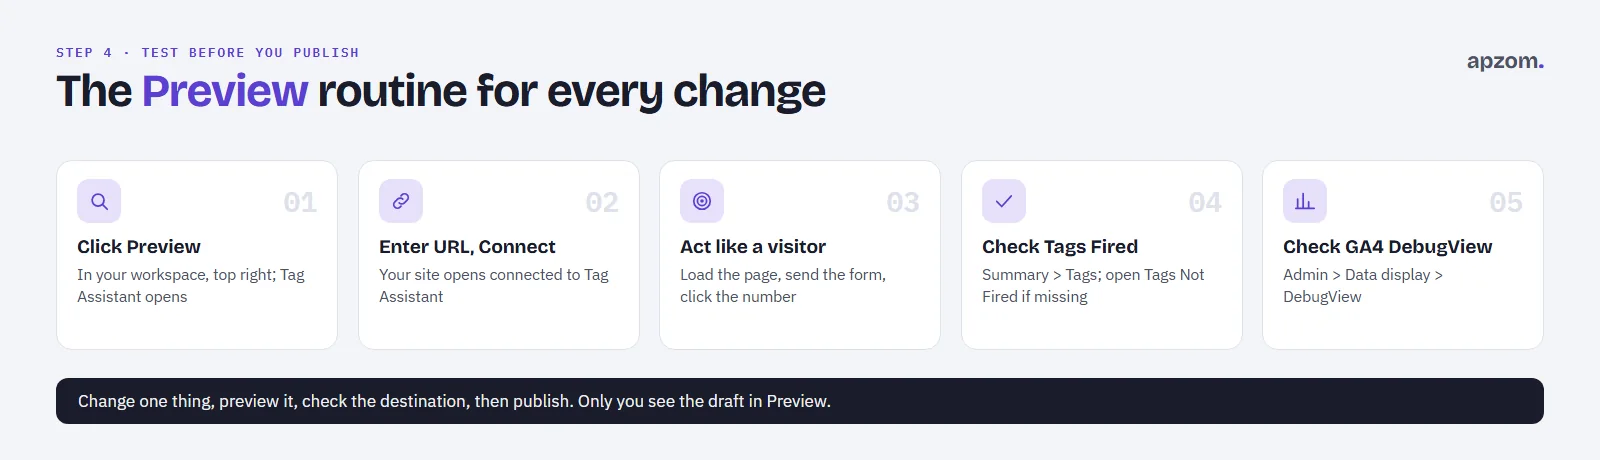
Preview mode lets you use your own website “as if the current container draft was deployed”, in Google’s words, while nobody else sees the changes.
- In the Workspace tab, click Preview (top right). Google’s Tag Assistant opens in a new tab.
- Enter the address of the page you want to test and click Connect. Your site opens in a new window (or a new tab, if you have the Tag Assistant browser extension), connected to Tag Assistant.
- Do what a visitor would do: load a page, submit the form, click the phone number.
- Back in Tag Assistant, open Summary > Tags. Check that your tag is listed under Tags Fired, and only on the event you expected. If a tag should have fired but did not, find it under Tags Not Fired and click it to see which trigger condition failed.
- Check the destination too. In GA4, go to Admin > Data display > DebugView and confirm your events arrive. If you use a consent banner, events from a visitor who has not consented to analytics may not appear.
- When you are done, click the X in the upper left corner of the Tag Assistant debug interface, or click Stop debugging.
You do not need a separate extension to use Preview. Google has merged its older Tag Assistant Legacy and Tag Assistant Companion extensions into one Tag Assistant extension, which is optional.
A simple testing routine for every change: change one thing, preview it, check Tags Fired and the destination, then publish. Testing several changes at once makes it hard to tell which one broke something.
Step 5: submit, publish and keep versions
Nothing you build reaches your visitors until you publish.
- In the Workspace tab, click Submit (top right).
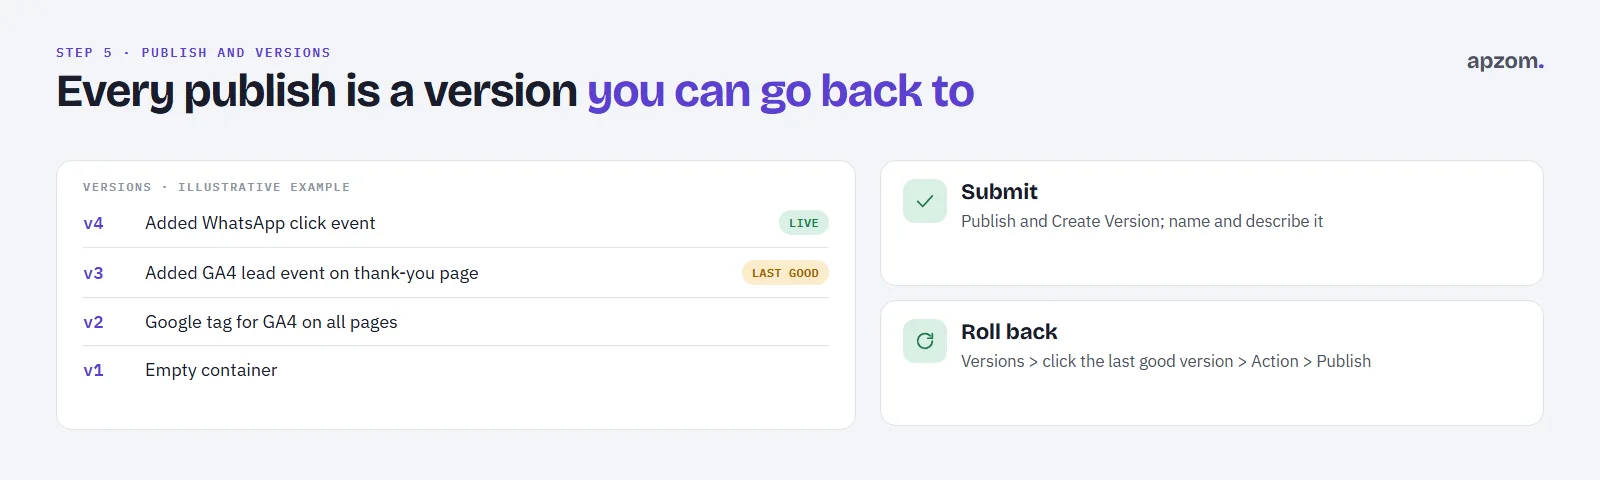
- Choose Publish and Create Version. (Choose Create Version instead if you want to save a snapshot without publishing it.)
- Give the version a name and a description that a colleague would understand in six months, for example “Added GA4 lead event on thank-you page”. Since September 2026, Tag Manager can suggest a name and description using AI, if your account shows it; read and edit the suggestion before you accept it.
- Click Publish.
Every published version is kept. To roll back after a mistake, open the Versions tab, click the last version that worked, then choose Action > Publish. Your website goes back to that version within minutes, once the published version loads, and you can fix the problem in your workspace without pressure.
Two settings help as you grow:
- User permissions. Under Admin, use User Management in the Account column to give account access (User or Administrator), and User Management in the Container column to give container access (No access, Read, Edit, Approve or Publish). Give an agency or freelancer Edit or Approve if you want to keep the final Publish step in your own team.
- Environments (Admin > Environments) let larger teams test on a staging site. Most small websites only use the default “Live” environment.
Consent: what beginners need to know
Consent rules depend on where your visitors are, and this section is general information, not legal advice.
If you have visitors in the European Economic Area, the UK or Switzerland, Google’s EU user consent policy requires you to get consent for the use of cookies or other local storage where legally required, and for personalised ads, to keep records of consent and to explain how people can withdraw it. Google Ads Help states it plainly: “Consent is required in the European Economic Area (EEA), the United Kingdom, and Switzerland.” For other countries, check your local privacy law.
Google’s way of passing visitors’ choices to its tags is Consent Mode. Google’s ads and analytics tags read four of its consent types:
| Signal | What it controls |
|---|---|
| ad_storage | Storage, such as cookies, related to advertising |
| analytics_storage | Storage related to analytics, for example visit duration |
| ad_user_data | Whether user data can be sent to Google for online advertising |
| ad_personalization | Whether data can be used for personalised advertising |
There are two ways to run it. In basic consent mode, Google tags do not load until the visitor interacts with your consent banner. In advanced consent mode, Google tags load straight away with the defaults you set (usually denied) and, while consent is denied, send cookieless pings without using cookies; they update when the visitor chooses. In basic mode, nothing is sent to Google until the visitor consents. Google Ads Help warns that blocking tags until the banner is used means Google cannot verify consent choices, which may lead to loss of data. Which mode is right for you is a legal and business decision.
In Tag Manager, consent works like this:
- Your consent banner (a consent management platform, or CMP) is usually added as a tag on the built-in Consent Initialization – All Pages trigger, so it runs before other tags.
- Google’s own tags have built-in consent checks: they read the consent signals automatically.
- Other tags (for example the Meta pixel) can be set to Require additional consent for tag to fire under each tag’s consent settings.
- Admin > Container Settings > Enable consent overview gives you one page showing the consent settings of every tag.
Consent Mode passes choices to Google’s tags; it does not collect consent by itself. You still need a banner or CMP that asks visitors and records their answers. In Preview, check that tags behave correctly both before and after you accept and reject cookies.
Common mistakes and how to fix them
| Mistake | What you see | Fix |
|---|---|---|
| Forgetting to publish | Everything works in Preview, nothing appears in reports | Click Submit, then Publish and Create Version |
| Analytics installed twice | Page views look too high | Keep one method: Tag Manager, a plugin or the builder’s own field |
| Trigger too broad | The lead event fires on every page | Use “Some Page Views” with a precise condition, then check Tags Fired in Preview |
| Testing only in Preview | The live site behaves differently, for example because of caching | After publishing, visit the live site and check GA4 DebugView or Realtime |
| Data layer declared after the container | Values your developer pushes are missing | Declare the data layer above the container snippet, as shown in Step 2, and never overwrite it |
| Vague version names | Nobody knows which version to roll back to | Name and describe every version before publishing |
| Container in a freelancer’s account | You lose access when they leave | Create the account yourself and add others as users |
| Counting clicks as leads | Reports show more “leads” than enquiries | Treat call and WhatsApp clicks as interest; use a thank-you page or confirmed bookings for leads |
Tag Manager also shows a container Size indicator (on the Versions pages, where it may appear); Google advises optimising the container if it reads above 70%. Every tag you add is more code for the visitor’s browser to run, so remove tags you no longer use. Our guide to Core Web Vitals explains why heavy scripts can slow your pages down.
How Apzom can help
Apzom Digital sets up and audits tracking as part of our performance marketing and Google Ads management work: Tag Manager containers in your business’s own account, GA4 key events, Google Ads conversions and the Meta pixel, each tested in Preview before it is published. If your current container is a mystery, we can review what is in it, what fires, and what is missing. Our guides to UTM links and the Meta pixel and Conversions API cover the next steps in measurement.
We work with clients worldwide, remotely, from our base in Ahmedabad, India.
Frequently asked questions
Is Google Tag Manager free?
Yes. Google Tag Manager is free. Tag Manager 360, the paid version for large organisations, is sold through Google’s sales team; most small businesses never need it.
Do I still need Google Analytics if I use Tag Manager?
Yes. Tag Manager does not report anything itself. It sends data to tools such as Google Analytics 4, Google Ads or the Meta pixel, and you read the results in those tools.
Will Tag Manager slow down my website?
The container itself is one script, but every tag you add runs more code in your visitors’ browsers. Keep the container tidy, remove unused tags, and watch the Size indicator.
Can I use Tag Manager and Site Kit together on WordPress?
Yes. Site Kit can place the Tag Manager container for you. Just do not send Analytics both through Site Kit and through a tag in Tag Manager; choose one.
Should my agency have its own Tag Manager account for my site?
No. Create the account and container in your business’s Google account and add the agency as a user with the permission it needs. If you ever part ways, you keep the container and its history.
What is server-side tagging, and do I need it?
Server-side tagging runs tags on a server you control, in your Google Cloud project or another environment, instead of entirely in the visitor’s browser. It adds hosting work and cost, and most small websites do not need it to get started.
Get your Free Growth Audit and Quote. We review your Tag Manager container, GA4 key events and ad conversion tracking, test them in Preview, and send a plain-English list of what to fix, with the container kept in your business’s own account.
No obligation and no guaranteed results. Prefer to talk first? Contact us or see our performance marketing service.